Saturday, January 28, 2017

Sanhita's Nonta Bhapa Pithe | steamed rice flour dumplings

Nonta Bhapa Pithe | Steamed Rice Flour Dumplings

Nonta Bhapa Pithe  | Jhaal Pithe | Steamed Savory rice flour Dumplings

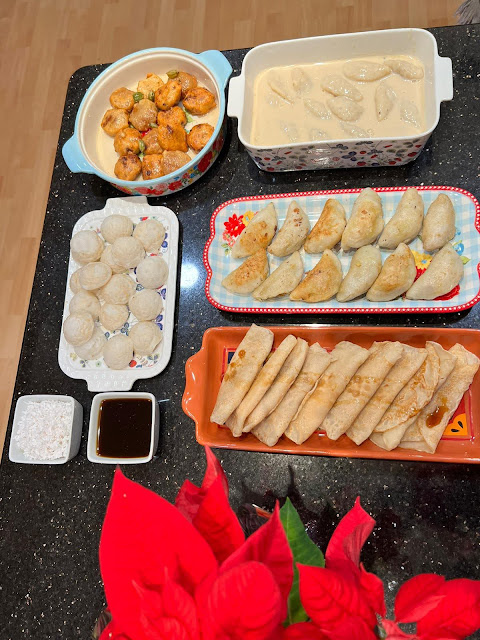
Pithe is reminiscent of the times when paddy was harvested in the months of December-January and the new crop was celebrated by making dishes that used rice, date palm jaggery(khejur gur also collected in the winter months) and coconut. There are a variety of pithe and puli made from these ingredients - patishapta, doodh puli, gokul pithe, bhapa pithe, chitoi pithe etc. While most of these have a sweet coconut-jaggery stuffing, the Nonta Bhapa Pithe is a steamed rice flour dumpling which has a nonta aka savory stuffing. It is also called jhaal aka spicy pithe because of the stuffing.

When the world around us is in a tumultuous state, among the few things that bring sanity, is food that has ties with our roots. Those ties might be frayed and not often remembered but it is there, a gentle reminder of who we are and how our journey has been. How in this global world, we have all immigrated, far from our roots, whether it is within the country or outside. There is comfort in knowing recipes that are old and yet have stood the test of time and movement. Knowing that this was the food prepared and consumed by my kin, in a different era, different world, in times of different beliefs, gives us strength in its perpetual persona.

Pithe,is reminiscent of the times when paddy was harvested in the months of December-January and the new crop was celebrated by making dishes that used rice, date palm jaggery(khejur gur also collected in the winter months) and coconut. Poush Parbon or Nabanno was a celebration of the new crop of rice, which was the mainstay for the then agrarian society. We have moved many years forward from those times where rice is now GMO and harvested multiple times and grated coconut can be found in the frozen aisles of grocery stores. Yet, we still take the effort to celebrate poush-parbon, in our home to honor those simpler times when we revered soil and its bounty, instead of taking it for granted like we do now.


Usually during Poush Sankranti, I hover between my fail safe recipes of paati-sapta and gokul pithe. I have never tried to make pithe with rice flour which is quintessential part of poush parbon for Bengalis. My Ma makes puli pithe which are rice flour dumplings shaped like a small rugby ball and stuffed with nice things like kheer or coconut. These "pulis" are then steamed and dunked in a milk based paayesh. I have never been fond of them or tried to make them. There was a nonta pithe or bhaja pithe that my Ma used to make with sweet pea stuffing. Those I loved butI have never worked with rice flour so didn't try making those either.

That doesn't mean, I miss those though. I know an amazing bunch of folks who are all very talented when it comes to cooking. One of our friends Sanhita, is an expert when it comes to whipping up traditional Bengali delicacies. Every year during Sankranti, she takes it upon herself to make all kinds of pithes and pulis, and then invites all of us over to her home for a pithe party. Didn't I say, I had amazing friends?


Monday, January 23, 2017

Spicy Green Beans in the Oven

Today Big Sis was talking about a friend of hers who is apparently very rich by hearsay.

Little Sis listened to the discussion for a minute and then declared "I will never be rich. Being rich is a waste of time!"

Astounded by this bite of information I asked, "Why is it a waste of time?"

Little Sis: "Well to become rich, you have to work hard and that will get you lots of money. Working hard is a total waste of time!"

I was left standing, my mouth agape, while Little Sis confident in her knowledge went off to bed.

But I am totally with her on the "working hard is a waste of time" funda. No wonder I don't like chopping vegetables. Any dish that calls for elaborate chopping of vegetables, is subtly skipped for better days, when I have ample time for an interesting movie to give me company while chopping. There can be nothing more boring than chopping vegetables while doing nothing else.


This Spicy Green Beans in the oven is the perfect recipe that lets me skip chopping, well a large part of chopping. You will have to use the knife but barely. For me, a bag of fresh trimmed beans from Costco does the trick. If you are buying from anywhere else, you will have to trim the ends but that's about it.

Spicy Green Beans in the Oven

Take a bunch of tender green beans. If you can get hold of trimmed beans you are in for immense good luck and fortune. If not, well then, you will have to trim the beans by sniping the head and tail.
Also "Tender" is the keyword here, but isn't that true for all vegetables.

Give them a rinse and pat dry.

Chop half an onion and two cloves of garlic in thick slices

Put beans, onion and garlic in a wide mouthed bowl

Toss them all together with
1 tsp garlic powder
1 tsp red Chili powder/Paprika
1/2 tsp of Cajun Spice powder(or any other spice. Aamchur and Bhaja Moshla can do the trick too)
salt to taste
2 tbsp Olive Oil

Let them sit in the marinade for 15-20 mins.


Now put them in a single layer in a baking tray and bake at 400F. Halfway through(after 15 mins) drizzle a tsp of olive oil and give them a stir.

Bake until the beans are brown and crinkled. We like them crispy so we bake for 30 mins.

While serving add a new dimension by adding either
slivered almonds
or feta cheese
or chaat masala and lime juice


If you like what you are reading, get Bong Mom's Cookbook in your mailbox
Enter your email address:


Delivered by FeedBurner

Saturday, January 14, 2017

Pyarakia or Gujiya -- sweet and savory


I had no intentions of making anything for Sankranti. As I always say, I don't want to eat any more sweet in January and the only things  I can make for Poush Parbon are sweet -- Paati Sapta and Gokul Pithe. I am not confident to make the puli pithe, seddho pithe or any other kind of pithe. Then last night I was talking to my Mom and I was ho-humming over whether I should make Koraishutir Kochuri today. The girls love Koraishutir kochuri and making the pea stuffing is not a difficult task with frozen shelled peas. Then my Mom suggested that I make Pyarakia.

Pyarakia is basically half-moon shaped dumplings made with flour and stuffed with a coconut-khoya filling or a kheer filling. The dumplings are deep fried and dunked in sugar syrup. I loved the ones with a kheer stuffing as a kid. My mother would make them pretty often and I would refer to them as the "binuni wala mishti"-- the sweet with the braided edge.I don't know if everyone calls it Pyarakia as I have often seen this thing going also by the name of gujiya.

Combining kochuri and the pyarakia, I decided to make savory Pyarakias with sweet pea filling. I also made some with a coconut-khoya stuffing but unlike my Mom, I did not dunk them in sugar syrup.

The girls loved the ones with the pea filling better and so did I.

Make the coconut-khoya filling


Take 1 cup of grated coconut. Fresh is better but I used frozen. Microwave the frozen one, to make it soft and fluffy

In the Kadai or Frying Pan mix the grated coconut with 1 cup sugar and mix with hand, pressing a little, so that the coconut will become slightly moist because of the sugar. This step is before the pan is put on the stove.

Next Microwave 1/2 Cup khoya to make it a little soft

Put the Kadhai/Frying pan with coconut mix in it on the stove and stir at medium heat.
Add 1/2 tsp of ground cardamom

Add the khoya and keep on stirring till the mixture turns a light brown and is sticky. At this point the mix should not dis-integrate but should look like a light brown slightly sticky granular substance. It took me almost 30 mins to do this


Make the sweet pea filling

Defrost 1 cup of frozen sweet peas. I usually prefer the Microwave for such purpose.

Put in a blender
the peas
1 tbsp of peeled and chopped ginger
1 green chili(optional)
very little water, a tsp to start with
Make a fine paste

Heat Vegetable Oil in a frying Pan

Add 1/4 tsp of Cumin seeds + a pinch of Hing/Asafoetida. I will insist on this as it lends an awesome fragrance. 

Add the pea paste that you just made. Sprinkle 1/4 tsp of Dry Roasted Cumin + Red Chilli Powder(Bhaja Moshla). Add salt to taste. If your peas are not sweet enough add a little sugar. If you like it hot add some Red Chili Powder. Improvise.

Now keep stirring till the water from the pea mix totally evaporates and the mixture becomes dry, thicker and congeals. This takes a good 20-25 minutes or more. Basically it should come to a stage where you can make a small ball for the stuffing.

Make the Dough

In a bowl take 1 Cup of Maida/AP Flour. Add a pinch of salt.

To it add 2 tbsp of vegetable oil or ghee. Mix with the tip of your fingers to get a crumbly texture.

Add warm water gradually to make a stiff dough. The dough will not be as soft as the one you make for luchi/poori/kochuri.

Wrap the dough with a cling wrap or damp cloth and keep aside for 15-20 minutes


These are the two stuffing I made -- sweet coconut-khoya and savory sweet pea


Take a small gooseberry sized ball of the dough and roll it out in a circle. Take a small ball of the stuffing and put it in the centre of the circle.

This one has the sweet coconut filling


This one has the savory sweet pea filling


Fold the circle to make a half-moon shape. Press and seal the edges with the tip of your finger. Make sure the edges are sealed properly, else the stuffing will come out while frying.


You are ideally supposed the braid/pleat the edges as you can see in the photo below. I was not good at that and so with the back of a fork made the empanada style markings to seal the edges


The husband-man could braid the edges. Yeahhh!!!!


Heat enough oil in a deep bottomed kadhai  for deep frying. Ignore the black edges. This is our deep-frying kadhai and this is how it is supposed to look.

When the oil is hot, gently put a dumpling in the oil. Fry each side for about 30 secs by which time it will be a nice brown. Flip and fry the other side.. Take it out with a slotted spoon and put on a plate lined with kitchen towel to drain the excess oil


The girls loved the ones with the spicy pea filling


If you like what you are reading, get Bong Mom's Cookbook in your mailbox
Enter your email address:


Delivered by FeedBurner

Wednesday, January 11, 2017

Oats Upma -- when you are trying to eat healthy


After eating the totally delicious pound cake for a month, I realized I needed to stop! I mean really, really stop and do something. Of course as a fallout of all the cake eating, there was a question of the weighing scale in my bathroom groaning and complaining. I couldn't let a weighing scale ruin my life could I ? So I actually moved it in the closet and shut the door on it.

But then Big Sis declared a restriction on my eating pound cakes, saying I should only eat one slice a week. It was a difficult rule to stick to, which meant I didn't stick to it, and all slices of pound cakes in my pantry were finally finished. This is when I realized I should really stop and go back to my healthy lunches routine.

I am good with my healthy lunches usually but I have realized if I fall through the crack, the crack morphs into an abyss and I have a harder time getting back up. It had to be something simple and yet tasty to haul me back on track. So I was back at making my Oat Upma. I like my oatmeal with mangoes and yogurt but this spicy oat upma is different. It doesn't make you feel all martyr like and holy and sacrificial because you are eating oatmeal while the world besides you is chomping on a philly cheesesteak. You feel proud about it actually and it only takes minutes to make.

Now in our home, we make this with steel cut oats as that is the only kind of oatmeal we buy(unless we are making oatmeal cookies which needs rolled oats but I will not talk of cookies any more). Also the husband-man usually make the oat pulao  but my method is little different from his !!! This time I bought a quick cooking steel cut oats which cut down the time to make this dish by 1/3rd, so if you find this particular kind in your store, do get it. And no, Bob's Red Mill did not sponsor me or even cares how I make my oats.


Saturday, January 07, 2017

Happy New Year with Deepshikha's Pound Cake


There are pound cakes and then there are pound cakes. Well, if I am absolutely honest, all pound cakes are amazing. I love their no-nonsense fluffy taste. But I am not sure if they are all as easy to make as Deepshikha's Pound cake.

It all started when our friend Deepshikha brought over individual cake loafs for us back in November. She has this charming habit of carrying home made goodies every time she visits. And when I say visits, I mean the long 10 hour drives from Ohio. I still remember her oatmeal raisin cookies way back in 2004, when I had no clue that such stuff could be made at home.

This time it was pound cakes. These quaint little loaves of pound cakes were so good that I had to stave off our other friends from finishing them. Actually, I will tell you a little secret. I hid one of the loaves that she gave me and did not take it out even when the other friends we had visiting were asking for more!Yes,I am evil like that.

And guess what the best part was ? These cakes needed only oil, no butter. If you know my baking disasters, you would know my woes about creaming butter and sugar. So any baking recipe that does not warrant that step is very very close to my heart. Also,Deepshikha had baked hers with Olive Oil and it tasted as good.

Here is the recipe she shared with me. I used regular Vegetable Oil. Also I used zest of half an Orange as I love citrus flavor in my cakes. They were so so good. The beauty of the recipe is that it doubles and triples very nicely. So to make 3 loaves of these cakes, just multiple every ingredient amount by 3.
Next time, I will make 6 of these and hide them from the family too.


Easy Pound Cake with Oil and Orange flavor

What You Need

AP Flour -- 1 Cup
Sugar -- 1 Cup

Oil -- 1/2 Cup
Eggs (at room temperature) -- 3

Baking Powder -- 1/2 tsp
Salt -- 1/2 tsp
Vanilla 1/2 tsp

Orange zest -- 1 tsp (optional)

How I Did It

Prep the wet mixture

In a bowl, beat the eggs. For about 3 minutes.

Next add the sugar to the eggs and beat again for 4-5 minutes at medium speed.

Now goes in the oil. Beat again at medium for 3 minutes.

Add the vanilla extract

Dry Mixture

In a separate bowl sift the flour, salt and baking powder. Add the orange zest to the flour and lightly rub it in with your fingers.

Combine

Slowly add the dry mixture to the wet mixture, mixing briefly at a very low speed, until everything is combined.

Bake

Pre-heat oven to 350F.

Grease a 9"x5" loaf pan generously with oil and pour the cake batter in it

Bake at 350F for 45 minutes to an hour. Do the toothpick test. Take a clean toothpick. Insert it in the center of the cake. If the toothpick comes out clean, the cake is done. If it has batter stuck to it, you need to give few more minutes.
Note: If you see the top of the cake is browning fast but the inside is not cooked, loosely cover the surface of the cake with an aluminum foil and continue baking. Towards the end of the bake time, remove the cover and finish the baking.

When cake is done, take out from the oven and let it cool. Be patient.

Eat.


If you like what you are reading, get Bong Mom's Cookbook in your mailbox
Enter your email address:


Delivered by FeedBurner