Friday, January 19, 2007

Dil Mangta -- Pasta


I am not a big Pasta fan, at least not the Italian way, give me Desi Pasta (if there is anything like it) and I would happily lick my plate. Yeah wipe that surprise off your face, there are people like me out there. I have had Pasta at Olive Garden, their soup and salad is great but the pasta, naaaaah nothing that I could fall for, then onto Macaroni Grill, their option of “Make Your Own Pasta” sounds great and the creation that I finally make is something that will send the Italians rolling their eyes at me(thank god the waitresses are much more tolerant). Maybe because I have had Pasta at only these chain places and not at an authentic Italian Bistro, I refrain from saying “Mamma Mia” when I see Pasta

No one would believe this and there would be more rolling of eyes, but the best Pasta I have eaten to date is in a restaurant called “Casa Picola” in Bangalore, India, you should eat it to believe it.
The next best pasta happened at home when D discovered Barilla Restaurant Creations, two jars that you mix to get the resultant sauce. He tried sugo alla napoletana and the pasta was divine. But sadly the Shop Rites and Stop & Shops (local grocery stores) carry it no longer and I think it is available only in select stores or online. So that had to go to.
Even S my lil’ one loves Macaroni Cheese and Noodles but Pasta in Sauce, no way, she claims that’s Pasta gone dirty !!!

So I end up Cooking Pasta like I would do Noodles and we all love it, no please, I see that smirk on your face , but I tell you there are people like me out there.
And then I found this Pasta in Mahanadi’s blog. The great cook that she is, trust her to throw a nice Indian touch to this dish. Get the Original Recipe Here.
I liked the idea of cumin and tomato paste as the base for pasta sauce. But the similarity ends there, almost… I did not have red bell peppers and did not want to use peanuts so I omitted them and added some of my own stuff to make it a little more healthy. But I loved what happened, the bold flavor of the cumin and dry red chillis made it smell just right. I also loved the blended soy chunks I used, they added a thickness to the sauce, something that would have happened if I added sausage


Read more...


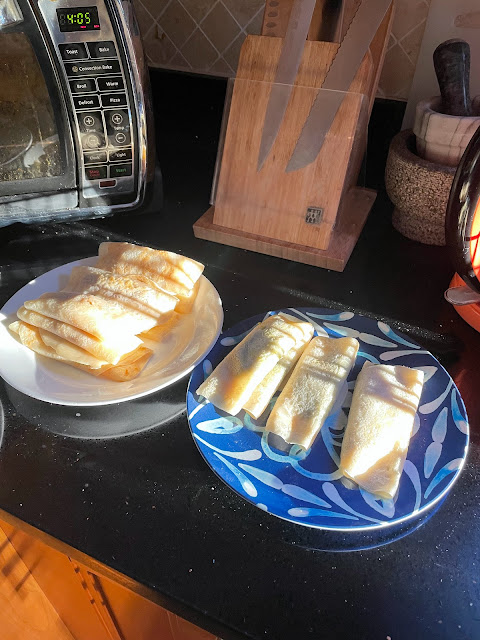
Pasta in Tomato Cumin Sauce

What You Need

Whole Wheat Pasta ~ 3 cup. I used Barilla Plus Rotini
Soy Chunks ~ ½ cup . I used Nutrela Soy Chunks
Tomato ~ 1 and ½ finely chopped alternatively use Cherry Tomatoes
Tomato Juice from canned Tomatoes ~ 2 tbsp
Garlic ~ 2 cloves
Dry Red Chilli ~ 4
Cumin Seeds ~ 1 tsp
Mixed Vegetables ~ ½ cup. Other veggies should also do.

How I Did It
Soak soy chunks in water and microwave for 1 minute or more till they are soft. Let them cool
Meanwhile chop tomatoes and garlic
In blender add soy granules, tomatoes, garlic, cumin seeds, dry red chillies, 2 tbsp tomato juice and make a fine paste
Cook pasta al dente according to instructions on the box.
Rinse cooked pasta with cold water and toss with 1 tsp of Olive Oil
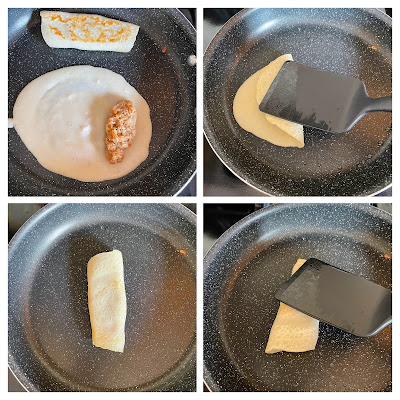
Heat Olive Oil in a Frying pan
Add 2 tbsp of onion paste
When the onions turn pinkish brown add the prepared paste and sauté till the sauce is cooked
Add about ½ cup of mixed vegetables. I use frozen mixed veggies which I Cooked in the microwave. You can use steamed veggies if you want.
When the veggies are cooked add the pasta.
Mix till the sauce coats the pasta well
The Rotini pasta retain the spices in their crevices and I like that. Served it with a home made strawberry-banana smoothie to offset the red chillis. Though to be truthful this was not at all hot for my spice level
For my daughter, omitted the red chillies and made the sauce

The good thing about this was that a plateful makes a hearty meal and the way I did it it was a quick mid week dinner. Thanks to Indira but you should really follow her recipe as I am sure that would be much more tastier.
This also goes to my blogger friend Coffee's Monthly Blog Patrol, see you there.
Trivia:Pasta existed for thousands of years before anybody ever thought of putting tomatoe sauce on it. Cortez, a Spanish explorer, brought tomatoes back to Europe from Mexico in 1519. Even then, nearly 200 years passed before spaghetti served with tomatoe sauce made its way into Italian kitchens.

Monday, January 15, 2007

Poush Parbon er Pati Shapta

Patishapta Narkel Kheer Pur diye | Bengali Crepe


India being a predominantly agrarian country the harvesting season is joyfully celebrated during the months of Poush-Magh and Falgun (January to February), the festival being known by different names in different regions. In Bengal the harvesting festival is known as Poush Parbon (Winter Festival), poush being the name of the month.

This festival also celebrates Makar Sankranti or Poush Sankranti — marking the sun's passage from Capricorn to Aquarius
This festival is also known as Pithey Parbon in Bengal, pithey being a sweet made with basic agrarian ingredients of the region like rice, date palm etc. .There are several varieties of Pithey known as Gokul Pithey, Ashkey Pithey, Shajer Pithey etc. Along with this, sweets like Pati Shapta, rice-flour crepes filled with khoya and coconut stuffing, Soru Chakli and many more are also made. A very nice article on this festival and the variety of sweets made can be found here
PatiShapta
PatiShapta -- Crepes filled with a coconut kheer stuffing

Though Poush Parban is more of a rural festival, urban households in Bengal celebrate it too, the emphasis here being on the food galore rather the pithey galore.

My baba’s side i.e my paternal grandparents house were a bit of a radical and didn’t celebrate poush parbon with much fervor but at my Dida’s house or my Maternal grandparents house all three days of sankrati were celebrated. I vaguely remember my Dida going around the house tying fresh hay to all the door handles in the house. She would also make varieties of pithey, the first batch being Ashkey pithey. She would store the first batch of pithey in an earthenware container as an symbolic offering to gods and later immerse it in the river.

With time however this has changed, even my Ma does not go around tying hay to door knobs and does not make all the 8-10 varieties of pithey on this day. She does make Puli Payesh, pati sapta and gokul pithey though. My Ma-in-law make sthis amazing Gokul Pithey and next time I am going to learn from her. This time I made Pati Shapta, rice flour crepes filled with stuffing of coconut & khoya, which I learnt from Ma. Traditionally I should have used Khejur Gur or Date Palm Jaggery but because of my khejur gur ration I used sugar instead

Ok so heres the recipe. This is going to be a piece of cake for all my friends from Southern part of India. In fact you guys can give me inputs on how to make this better as this was my maiden effort.


What You Need


For the pur or stuffing

Grated Coconut ~ 3 cup
Khoa ~ 12 oz
Sugar ~ 1 cup. If you can use Date Palm Jaggery that would be best

For Batter for Crepe

Maida or All Purpose Flour ~ 3 cup
Sooji or Semolina ~ ½ cup
Rice Flour ~ ¼ cup.
Milk ~ 4 cups + a little more. As you make the batter, if you feel the batter is not thin enough to spread out add more. Note: the batter needs to be really thin and you may need more milk for this. Ideally the batter should spread easily on the griddle when poured
1/4 Cup of sugar

How I Did It

For the Pur or Stuffing

Take 3 cups of grated coconut. Fresh is better but I used frozen. Microwave the frozen one, to make it soft and fluffy
In the Kadai or Frying Pan mix the grated coconut with 1 cup sugar and mix with hand, pressing a little, so that The coconut will become slightly moist because of the sugar. This step is before the pan is put on the stove.
Next Microwave the khoya to make it a little soft
Put the Kadhai/Frying pan with coconut mix in it on the stove and stir.
Add the khoya and keep on stirring till the mixture turns a light brown and is sticky. At this point the mix should not dis-integrate but should look like a light brown slightly sticky granular substance. It took me almost 30 mins to do this


For the Crepe

In a big bowl add,
3 cup pf Maida/ All Purpose Flour
1/2 cup of Sooji
1/4 cup of Fine Rice Flour. If you have store bought rice flour you may need to grind it once more in your dry grinder to make it fine. 
1/4 cup of Sugar

Add 4 cups of Milk, do not add all the milk all at once, add it as you mix so you get an idea as to the consistency of the batter. You may need to add a little more of milk or water depending on the batter thickness. The batter should be a little more liquid than pancake batter. Make sure the batter has no lumps.
Cover the batter and set it aside for couple of hours to rest.

Heat a Frying Pan and smear a little oil/ghee on it. Just a brush of oil or ghee is fine.
Take a ladle full of batter (about quarter cup) and pour it on the Frying Pan and tilting the pan and moving the mixture with back of the ladle, evenly distribute the batter in a circle . You have to do this quick before the mix sets.

Once you feel the bottom side of the crepe is cooked, put the stuffing lengthwise towards one of the edge of the crepe. It is the same with savory or sweet stuffing.
Fold the crepe into a roll and lightly press it down. Give it a minute to get the brown spots, if you like it that way. Take it out on a plate and start with the next,


For serving
Drizzle the crepes with condensed milk and serve hot. Ideally my Ma use to thicken the milk, sweeten it and pour it over the crepes. I cut the method short with condensed milk

What I learnt
While using rice flour you have to be careful to make the batter a little more thinner and the crepe more thin, only then it remains soft even when cold. My batter in this case should have been more thin, a consistency that would spread easily on the griddle by tilting the griddle around


Updated on Jan 14th, 2020:

Finally, I have got hang of the Rice flour in patishapta

Make Batter

Rice Flour (from Indian stores) -- 1 Cup
Maida or AP Flour - 1/2 Cup
Sooji or Fine Rawa -- 1/4th Cup

Milk -- 2&1/2 Cups at room temperature

Sugar -- 3 Tbsp

Make a smooth batter by whisking the above ingredients, make sure there are no lumps. The batter should be thinner than pancake batter.

Make the Crepes

Take a small non-stick crepe pan. My omeltte pan serves the purpose.

Brush the pan with a few drops of oil. Raise the gas heat to high.

Take little less than 1/4th Cup of batter and pour on the center of the pan, quickly swirling the pan to spread the batter.

Now lower heat to medium and cook the crepe until edges start turning light brown. Lift the edges to see if the crepe is developing brown spots.

Put the stuffing towards the edge and wrap the crepe around it. Remove and serve hot

Get this recipe in my Book coming out soon. Check this blog for further updates. 

Saturday, January 13, 2007

KamlaLebur Kheer or Orange Kheer


Jump to Recipe

...Orange Kheer in want of a better name. Kamlalebu in Bengal, is what is Narangi, Santra or Orange in different parts of India.

Kamlalebu or Orange is a fruit which I closely associate with the mild Winters back home in India. Come winter and the markets would flood with these small round glossy skinned orange colored beauties. The Darjeeling Orange I am familiar with were grown in Orchards in the hills of Darjeeling and would come down to the plains of West Bengal around the months of November-December
By then the finals and later the half-yearly’s would be over and school would break for a reasonably long stretch of winter vacation. Every day after our mid morning bath the ritual would be to head for the terrace or chaat with oranges in one hand and a book in the other.
Sitting there soaking up the soft orange sun, peeling the oranges, popping one koa (or segment) after other , the sweet juice exploding the taste buds and being lost in the novel which had been neglected for the exams or the Anandamela ( a very popular childern's magazine in Bengali) which had arrived just that morning…that was life, warm, sweet and carefree.

My Ma like most other Bengali households would make this Kamlalebur Kheer during these months and serve it as a dessert with luchi & alurdum or by itself. It is pretty easy to make and considering the very little effort that goes into it, it’s heavenly to taste.


What you Need
Whole Milk ~ 1 litre
Sweetened Condensed Milk ~ 1 can
Sugar ~ 1/2 cup

Clementines or Oranges ~ 7 or 8 . I used clementines , you can try with other sweet oranges like mandarin oranges. You can also use canned mandarin oranges.


How I Did It

Peel the oranges and separete out the segments
Take out the transparent thin film/skin and the white thread like thingy from each of the segments and make small pieces
Heat Milk in a deep pan
Bring the milk to boil and then stir it intermittently
Add a can of condensed milk and continue the process of stirring
When the milk has reduced a little add the sugar
Keep on stirring continuously at medium heat till the milk has reduces to almost ¼ the initial volume. By this time the color of the milk would take on a creamy hue and it would have thickened. Continuous stirring is necessary else the milk may stick to the bottom and burn
The consistency is now like smooth kheer
Pour in a serving bowl and put in the refrigerator.
After 2 hours or when it has cooled down add the orange pieces and refrigerate for 3 to 4 hours
Serve chilled

Note: I made this yesterday night but it tastes even better when I am having it right now in the morning, all that overnight saoking has made the milk/kheer soak up the orange flavor

Updated on April 15th, 2013: To make a quick and cheater's version of this dish, in a sauce pan add 1/2 cup milk + 1 cup condensed milk. Mix and bring to a boil. Keep stirring and let the milk thicken. will be done in like 15 mins or so. Now pour in a serving glass bowl and chill in refrigerator. Once cool add the orange segments.


Here in the US I was initially and even now baffled with the choice of Oranges offered. Product of various mutation I have a varying choice from Navel Oranges to California Oranges and the Valencia to the Mandarin orange and I still am not sure which I should pick

The closest that I have found to the small, sweet Orange popular in India, known as Kamlalebu in Bengali is a fruit called Clementine. Clementines are commonly called mikan in Japan, satsuma in the UK and Southern United States, and clementine or tangerine in Canada. Its fruit is sweet and usually seedless, about the size of a mandarin orange (Citrus reticulata), smaller than an orange. One of the distinguishing features of the clementine is the distinctive thin, leathery skin dotted with large and prominent oil glands, which is lightly attached around the fruit; enabling it to peeled very easily in comparison to other citrus fruits. They are widely available in the US from November to January-February

What I like about Clementines is that they peel very easily and easily separate into several juicy segments a feature similar to my familiar Orange in India. Since Clementine too is a hybrid but between Tangerine and pomerans, I am not sure if the Orange or Santra or kamlalebu in India was also a Clementine or some other hybrid of orange


I am sending this over for this weeks Kalyn's Weekend Herb Blogging to Coffe & CornBread. Hope all of you like this simple and delicious dessert

Trivia:It has been proposed that Clementine was "originally an accidental hybrid said to have been discovered by Father Clément Rodier in the garden of his orphanage in Misserghin, Algeria."